From the day it is manufactured, a car battery starts to deteriorate gradually up to the point that it will be too weak to start your car. Knowing that an average car battery has an expected life span of only 3 to 5 years, it’s important to check your car battery’s health every once in a while so you can replace it before it gets to the point that you won’t be able to start your car at the most inconvenient place and time.
A basic car battery test can easily be done with a simple, affordable tool most people already own: a multimeter.
If you can diagnose a bad battery with your multimeter before it quits, you’ll have time to shop around for the best car battery at the best price instead of having to buy what’s available off-the-shelf and overpay $100 or more. That’s a huge bonus in our book!
We’ll show you how to test your car battery with a multimeter, in an easy step-by-step guide.
Everything you need to test a car battery with a multimeter:
- Multimeter
- Spanner for the battery clamps (optional)
Here’s How To Test Your Car Battery In 10 Simple Steps Using a Multimeter
- Locate your car battery
Most car batteries are located under the hood, although some are mounted in the trunk under a hatch or behind a side panel. Check your owner’s manual when in doubt. - Turn your multimeter on and switch it to DC Voltage
Sometimes it says “DC” or “DCV” on the multimeter, but most of the time, it’s a “V”-symbol followed by two lines, a solid line with one dotted line underneath. That’s the symbol for DC Voltage or “Direct Current Voltage”. - Select the right Voltage range
 Depending on the type of multimeter, you will have to select a voltage range. Select a range that is just above 12V (car battery voltage), like “20”.
Some digital multimeters automatically detect the voltage range and you only need to select “DC” (the “V”-symbol followed by two lines, a solid line with one dotted line underneath).
- Switch off your engine and all electric accessories
Before measuring your battery voltage, first turn your car engine and all lights and electric accessories off. (ventilator, radio, interior lights, rear window defrost, phone charger, aftermarket GPS,…) Then close all the car doors and the boot lid.If your car battery is located under the hood, make sure that there’s no courtesy light burning under the hood. If there is, push and hold the light switch to turn it off or remove the light bulb.
If the battery is in the boot, hold the boot lid light switch pushed in or remove the light bulb so the boot lighting is off.
- Test the battery voltage
 With the tester switched on and the right voltage range selected, hold the tester’s red test lead to the red (positive / +) battery terminal and the black test lead to the black (negative / -) battery terminal.
If your tester reads 12.6V or above, your battery has passed the first test, its voltage is within specs. If it reads below 12.6V when you’ve just driven your car for more than 20 minutes or when you’ve just charged it, your battery is probably on its way out.
However, this is just the first test. You may also have a bad alternator or a parasitic draw (don’t worry, it’s not contagious ;). More on that in the next steps.
NOTE: Some modern cars’ onboard computer management systems perform all kinds of behind-the-scenes checks and diagnostics up to half an hour or longer after you switch off and lock your car. Some cars also react and wake up because of the proximity of a car key or smartphone bluetooth signal. This may also influence voltage readings.
When battery voltage is slightly lower than it should and/or fluctuates or readings don’t seem right, you’ll have to disconnect your car battery to perform accurate tests.
If you don’t want to lose your radio presets and some other personal settings, you’ll first have to connect a power supply or another car battery. Don’t worry, that’s very easy to do:
With your battery still connected to your car terminals, connect a power supply with its red alligator clamp to the metal sleeve on the red battery cable, but in a way that you can still reach and undo the terminal bolt.
Now clamp the black alligator clamp of your power supply to any blank metal part under the hood of your car like the suspension posts or engine. Choose a location as far away from the battery as possible to avoid contact sparks near the battery. Batteries produce hydrogen gas which is highly explosive.
Keep the alligator clamps in place while removing the battery terminal clamps and your car’s settings should be safe. Now you can test your car battery when it’s completely disconnected from your car.
If you don’t have a power supply, you can also use another car battery. Same idea but using jumper cables. Now that your car battery is disconnected from your car, you can check its voltage and get reliable test results.
- Test battery voltage drop at engine startup
You can perform a voltage test under load with your battery connected to your car just using a multimeter. This will give general indication of the battery’s power and the state the battery’s internal plates are in.With all electric accessories turned off and your multimeter contacting the battery terminals, keep a close eye on the meter’s display when you start your car. When the starter motor turns over, the battery voltage will drop for a split second until your engine kicks in, which is normal.
However, if the voltage drops below 10V while cranking, your battery should be replaced because it is too weak.
- Test the alternator’s charging voltage
To make sure your alternator charges your battery properly, you can test the voltage at the battery terminals with the engine running at idle. First check that your battery is fully charged (12.6V or higher) before performing this test.
If voltage is within the 13.7 to 14.7-14.8 volts range while idling, the alternator is working as it should.
If the battery voltage is below 13.6-13.7 volts, the alternator is charging insufficiently, which is bad for your battery life and performance.
Even worse is a voltage above 15V, which leads to overcharging. This is most likely because the voltage regulator isn’t working properly. The battery will boil dry and might explode. Chances are that even your electrical system will get fried. This should be addressed without delay to prevent further electrical damage.
- Test for parasitic draw
 A parasitic draw, drain or “key-off load” drains your battery when your car is not in use. With the ignition key off and removed, all doors, boot lid and hood closed, something is still using excessive electrical power.
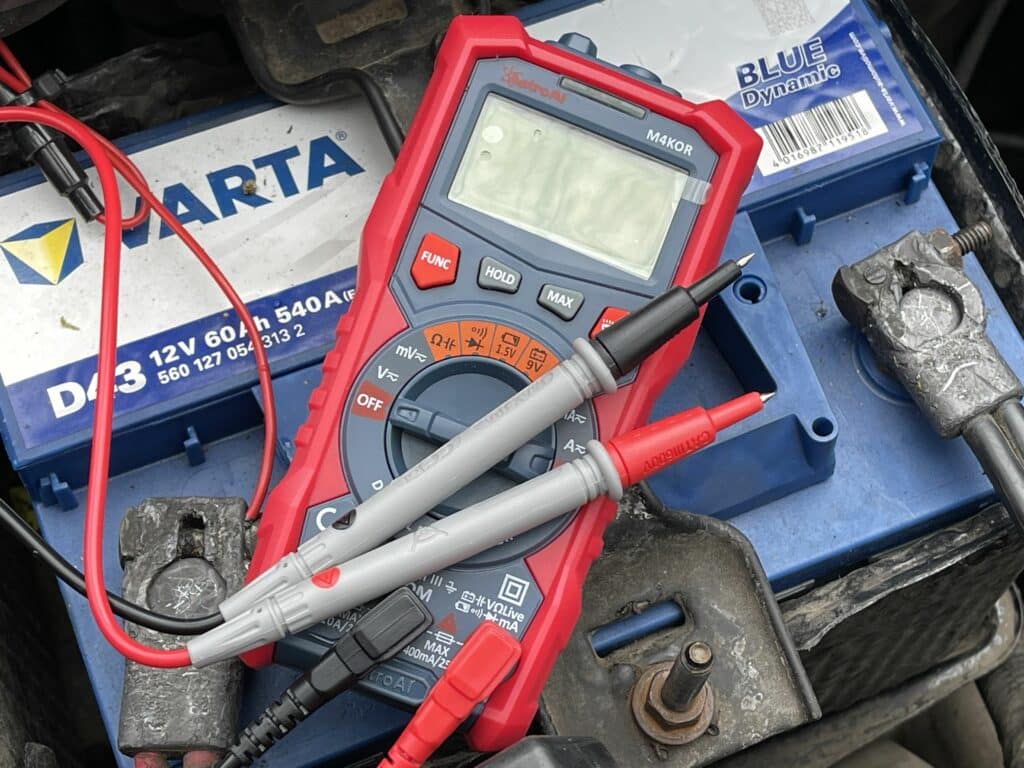
Luckily, this is easy to test with a multimeter that has a DC amp (A) setting, symbolized by an “A” followed by two lines, a solid line with one dotted line underneath.
NOTE: The tester in the picture above doesn’t have a DC Amperage setting on its selection dial. Instead it only has an “A” symbol setting, followed by a solid line with a wave line underneath. This symbolizes AC Amperage. However, in AC Amperage mode you can push the “FUNC” button to select DC Amperage, as shown on the display.
Many multi testers have unusual quirks, so before first use, you want to read the user manual thoroughly to make sure the right setting is selected.
First, slacken the nut of the black (negative / -) battery terminal clamp and gently work it loose. Take the clamp off the post and put it alongside the negative battery post without making contact.
With your tester on and switched to the highest amperage value, usually 10A, plug the red test lead in your multimeter’s 10A lead socket (on most testers; consult manual when in doubt). Some testers only have a mA (milliamps) and an A (amps) setting, in that case select the A setting.

Now measure the amperage between the black (negative / -) battery clamp and negative (-) battery post, it doesn’t matter which test lead goes where, it works both ways.
For new cars with much electronics, a maximum value of 85 mA is acceptable, because there’s always some PCU or component running some kind of test or protocol in the background. For older cars with hardly any “intelligent components”, 50 mA is the limit. Higher than that means there’s some device that doesn’t switch off completely when the contact is switched off. That’s called a parasitic draw, drain or “key-off load”.
A parasitic draw can originate from any lamp, radio, charger or often from a short in the car’s wiring somewhere. Sometimes it’s something simple like a glove box or trunk light that doesn’t switch off when it’s closed. These parasitic draws, although small, can gradually but continuously drain a car battery and shorten its life dramatically because it’s always partly drained. Once your battery is too weak to start your car, it’s often too far gone to recondition it and it will have to be replaced. Yet, if the problem isn’t detected and solved, the new battery won’t last long either.
If you have a parasitic draw, you can easily trace the source by elimination. Simply leave your tester switched on as is, between the black (negative / -) battery clamp and negative (-) post and keep an eye on it while you remove the fuses one by one and put them back immediately if the mA value doesn’t change.
When you remove the fuse that “feeds” the parasitic draw, the mA measurement will drop dramatically. Then you know where to look. Check what’s powered by this fuse and try to isolate the culprit by elimination.
Have a professional look at it if needed, but by pinpointing him in the right direction, you’ll probably save a few hours of costly professional labor.
 Depending on the type of multimeter, you will have to select a voltage range. Select a range that is just above 12V (car battery voltage), like “20”.
 With the tester switched on and the right voltage range selected, hold the tester’s red test lead to the red (positive / +) battery terminal and the black test lead to the black (negative / -) battery terminal.
 A parasitic draw, drain or “key-off load” drains your battery when your car is not in use. With the ignition key off and removed, all doors, boot lid and hood closed, something is still using excessive electrical power.
Car battery problems always come at the most inconvenient moments. Your car won’t start right before you have an important appointment or your car battery may quit while driving through that rough part of the city where you don’t want to be stranded at night. Murphy will make sure it’ll be raining or snowing too…
That’s why you want to check your car battery every once in a while before it gets to that point. By testing your battery with a multimeter, you’ll know when it’s time to replace it and be able to do so at your convenience. You won’t have to buy a new car battery off the shelf at the nearest store and pay more than double the price you would if you had time to shop around.
Besides these basic indicative tests explained in this article that can be performed using a simple multimeter, you can also test your car battery with professional car battery testing equipment like car battery stores and car dealerships do. These specialized car battery testers are surprisingly affordable and a must-have for any DIY-minded person.
No matter what tool or method you use to monitor your car battery’s health, make sure you do it on a regular basis because it’ll save you a lot of money and aggravation.
Be Safe!
FAQ
Can Testing a Car Battery Damage the Battery?
No, when a car battery test is performed correctly, it can not damage a healthy battery.
However, if the battery is tested or connected incorrectly it may. That’s why it’s very important to read and follow the tester manufacturer’s instructions. Additionally, it’s wise to also check your car owner’s manual for specific tips and instructions.
It’s also important to know that when a car battery is at the end of its life and its internal plates are very brittle and corroded, an “old school” load test which discharges the battery at high amps to simulate a heavy electric load might cause it to fail because it can’t handle the load.
This means the car battery would have failed in the next few days or weeks anyway. In that case you had nothing to lose and it’s better that it fails during that load test than randomly on the road somewhere, right?
When Do I Need to Buy a New Car Battery?
If you’re wondering when it’s time to replace your car battery, we’ve got you covered. Check out our comprehensive guide on “When to Replace Your Car Battery” for all the details and tips you need to know.