On our continuous hunt for cool stuff that is useful for vehicle maintenance and diagnostics, we came across the InfiRay P2 Pro, the world’s smallest thermal camera. It’s about the same size as a quarter.
Does this little guy deliver? Let’s dig in and find out to see what’s hot and what’s not (pun intended):
|
Tested by CCM

|
|
What We Like
What We Don’t Like
Bottom Line If you’re looking for an incredibly compact and easy-to-use high quality thermal camera, it doesn’t get much better than the InfiRay P2 Pro. |
What We Like
- Super small
- Easy to use
- No separate battery needed
- Outstanding performance
- Exceptionally wide heat range
What We Don’t Like
- No hard storage case included
Bottom Line
If you’re looking for an incredibly compact and easy-to-use high quality thermal camera, it doesn’t get much better than the InfiRay P2 Pro.
Unboxing
The InfiRay P2 Pro comes in a nicely designed box. Ours is an iOS version with a macro lens, but it’s also available for Android or without the macro lens.
What’s Inside

The envelope contains some instruction manuals and a little pouch to store the P2 Pro. Although the pouch will probably do its job, we would have preferred a hard shell carrying case to protect the lenses a bit better at this price point.
First Look

Compared to competing add-on thermal cameras, this device is amazingly small. The android version is even a bit smaller than our iOS model. Weighing only 11 grams (9 grams for the android version), it really is a featherweight. Despite the minimal weight, the case is made from sturdy aluminum which gives it a quality feel. The connector connects securely to the smartphone charging port, preventing the camera from getting loose under its own weight while using it.
Specs
This thermal camera shoots 24 frames per second, with a resolution of 256 x 192 pixels, which raises the bar considerably for the competition.
It can measure from minus 4°F to an incredible 1112°F, which is exceptionally high.
First Use

Before you can use this device, you need to download the “Thermal P2” app from the App Store (iOS) or Play Store (Android), plug the camera in your charging port and open the app. As soon as the app connects with the thermal camera, it is ready to use.
A big advantage the P2 Pro has is that it uses your phone’s battery, and does not rely on internal batteries that need to be charged.

Another great design feature is its black spacer, which allows the device to be plugged in even if you have a thick phone case.

In our set, there’s a macro lens which allows for close-ups, making this thermal camera ideal for inspecting smaller electronics. It’s got a small lens protector cap, and it sticks to the thermal camera with a magnet.
The macro lens is easy to install: Just line it up with the thermal camera, and it magnetically locks in place in front of the thermal camera lens. It’s a pretty solid connection, so it won’t shift or come off. Yet, it is easy enough to separate them if you want to. Before you can start filming, you have to first take off the protective lens cover, of course.
Settings
P2 Pro’s easy-to-use app has a lot of settings that allow the thermal camera to adapt to your preferences. To test all the settings in the app, we’re using a soldering iron on the lowest heat setting on our workbench.

At initial startup you can immediately see the 3 measurements on your screen. The point in the center of the screen shows the temperature of that exact spot. The two other indicators show the highest temperature, and the lowest temperature measured on your screen.

You can change the color palette too by simply pressing the color palette icon. This can be very helpful to better distinguish between colors if you have some form of color vision deficiency. Next time you use the camera it will remember your settings. There are a lot of color schemes to choose from, but we’ll be using the rainbow setting with colors from dark blue (coldest) to red (hottest).

When you open the settings menu in the left hand top corner, you can select the “Professional Thermometry” mode. This mode has a lot more temperature reading options to choose from. You can add up to three measuring points and drag them around the screen. In the left hand top corner you can see them listed with their real-time temperature reading.

You can also add a line or a square that you can drag to the desired size and position. After drawing the line or square, the app will give you the maximum temperature, the average temperature and the lowest temperature on that line or in that square.
In total, there’s a maximum of three temperature readings per measuring mode that can be shown simultaneously in real-time on the same screen: 3 points, 3 lines and 3 squares (meaning 9 features in total). That’s pretty impressive in our book! On an average size smartphone, the temperature readings in “Thermometry Mode” can sometimes be hard to read though, because they are very small. A light-colored background may make it even harder. You better bring your best reading glasses…
To remove a measuring point or shape, select the corresponding shape in the menu and tap once on the shape you want to remove. If you want to remove all of the points, lines and squares you added on the screen, just press the delete button and they’re gone.
Every now and then, the screen seems to freeze very shortly, but that’s just the thermal camera calibrating and that’s perfectly normal with these devices.

You can change and lock the scale for the corresponding shape(s) (dot / line / square) to select specific heat ranges you want to visualize.
You can also adjust the scale to highlight a certain temperature range. This can be really helpful if you need to check if something is surpassing normal operating temperatures. Just set the scale above the normal temperature and it will highlight the parts that are too hot.

In the bottom right corner you can find more specific settings. You can adjust the variables to get more accurate readings (Variable Correction) You can also select the surface you’re scanning, adjust ambient temperature and distance from the camera.
In our version of the app it says “personaliza”, which is Italian for “customize”. This is a small bug in the app, so we’ve contacted the people from InfiRay to notify them of this issue. They immediately responded that they are investigating the issue and told us they’re going to fix it in one of their next updates. So by the time you read this review, this issue is probably already solved.
You can also change the measurement mode. You can choose between high quality images with normal heat range, wide range or automatic switching between the two.
The wide range will show, as the name suggests, a much wider range of temperatures and doesn’t calibrate depending on how hot the object is. However, this setting has a less detailed image. We like the detailed image best, especially when dealing with electronics or car parts.
We think it’s important to know where exactly the heat is coming from to pinpoint potential issues or defects.
In Image settings you can manually adjust the brightness and the contrast to make the image clearer. You can also change some other features as well like voice registration. To revert back to the standard settings, just press the arrow icon.

In the settings menu in the left hand top corner, you can also change the Measurement settings depending on your preferences. Temperature can be displayed in Celcius, Kelvin or Fahrenheit. An audible temperature alarm can also be set, which will go off above a maximum set temperature or below a minimum set temperature.
It even has burn protection to protect the camera when you accidentally point it at the sun or an object that is too hot.
Finally there are some General settings like the language and theme settings.
If you want to save your data, you can take a photo or a video with the app, , just like you would with your phone. Afterwards, just open the gallery to view the result. You can select a single or multiple photo setting, and even share the photos with other devices. This can come in handy if you want to show a heat-related problem to someone else.
Testing
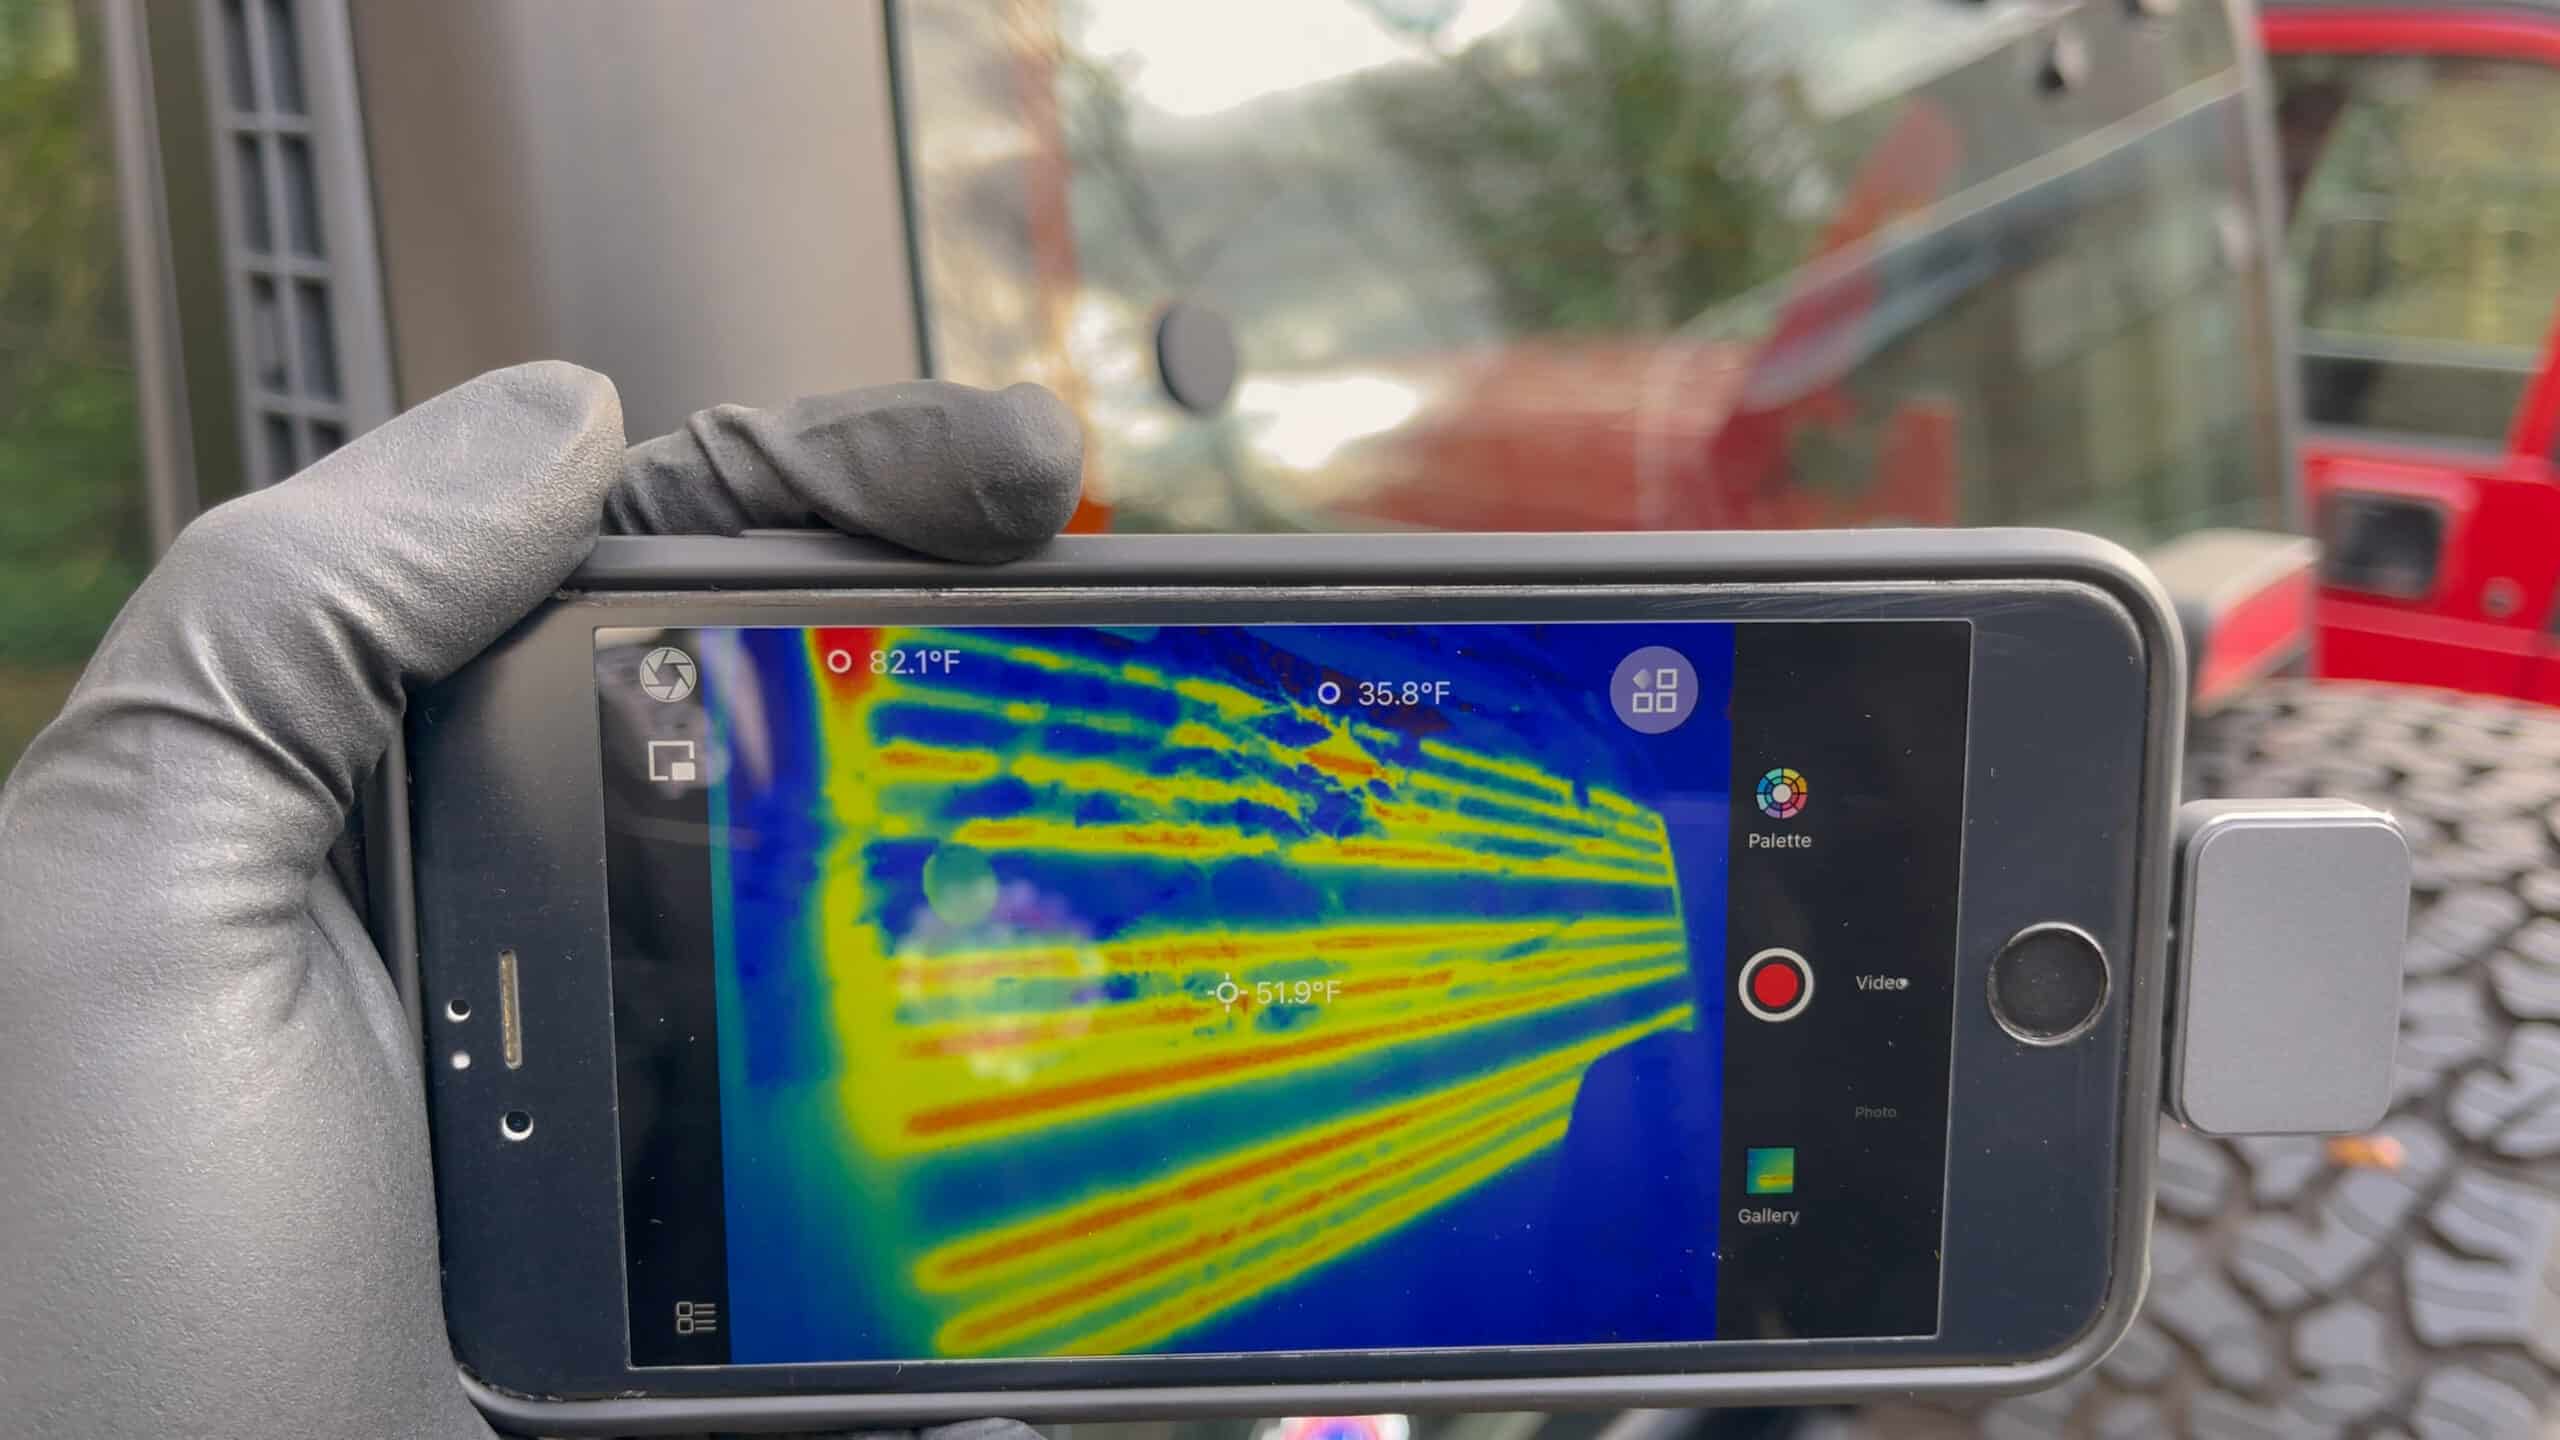
For our first test we pointed the camera at the fogged up rear window of our Jeep. The rear window defogger was switched on and worked, but not perfectly. By simply checking it with the InfiRay P2 pro we could immediately see that 2 heating elements weren’t working (two wide spacings between the heating strips).

For our second test we took our Jeep for a short drive to warm up the engine and all moving parts. With the P2 Pro we could easily check for irregularities. We could see if the brakes or bearings weren’t overheating. No more guessing, we just pointed the camera at it and saw the difference in temperature. It was also very useful to quickly scan the radiator and to see if the engine was running at normal running temperature. We also checked the electronics for excessive heat and that the drive belts and pulleys weren’t overheating because of too much friction. All these checks were performed fast and easy with the InfiRay P2 Pro.

The camera had no problem switching / recalibrating between a cold tire and a warmed up tire and brakes. It very clearly indicated all the temperature differences, from around 50°F to 200+°F, showing all the parts in high detail. We didn’t have to look at a vague orange or red blob on screen with lots of lag. This high-definition thermal camera really revealed every detail in real-time.

Thirdly, we tested the InfiRay P2 Pro on small electronic components. Although this camera already showed a much more detailed picture than other comparable thermal cameras, when bringing it up real close, it became blurry. That’s where the macro lens really shone. By simply lining up the macro lens with the P2 Pro, the magnet locked into place all by itself and allowed us to inspect even the tiniest component in detail.

While the standard lens got blurry when we moved in too close, the macro lens did the opposite: It showed a blurry picture from a distance, but the image got sharp and crystal clear when we got closer to the subject. That is exactly what you’d expect from a macro lens.
When aiming the macro lens at our soldering iron tip, which was set at 180°F, the P2 Pro read the exact same temperature, which is quite amazing!
The Verdict
We can confidently say that the InfiRay P2 Pro is a great thermal camera. Being about the same size as a quarter, it rightfully holds the title of the worlds’ smallest thermal camera.
But don’t let its size deceive you, it leaves most comparable devices far behind with its very impressive 256 x 192 pixel resolution. It delivers high quality thermal images that show even the smallest details. While most competitors shoot at a rate of 9 frames per second, this little powerhouse cranks it up to an amazing 24 frames per second. It also delivers a very smooth image, leaving most competition biting the dust.
InfiRay’s app is easy to use and offers great functionalities, making it possible to customize your view, add measuring points and share the images with other devices. Because it’s powered by your smartphone’s battery, you never have to worry about charging the InfiRay P2 Pro, it’s always ready for action.
This thermal camera can measure from -4°F to an incredible 1112°F, which is a much higher temperature than the competition. And if you want to inspect tiny details on electrical components, you can also order it with a super convenient macro lens, like we did.
We would have liked this small wonder to have a hard case to safely store it in however, because its small size makes it easy to lose it.
Our verdict: If you’re looking for an incredibly compact and easy-to-use high quality thermal camera, it doesn’t get much better than the InfiRay P2 Pro.
Well done, InfiRay!
Pros:
- Very compact, portable, lightweight
- Sturdy aluminum body
- Easy to use
- No separate battery needed, uses your smartphone’s battery
- High quality image, much better than the competition
- Outstanding performance in exceptionally wide heat range
Cons:
- No hard storage case included
Specifications